20-in-1 Push-Up Board + Bands: Portable Home Strength Plan
Portable Strength Training Without the Bulky Equipment
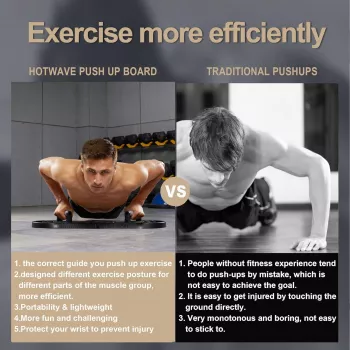
A compact push-up board with color-guided positions and resistance bands can turn a small corner of a room into a practical strength-training setup. The big advantage is structure: you get consistent hand placement, a more comfortable grip for many wrists, and band attachments that expand your options beyond standard push-ups. Below is a clear breakdown of what the system includes, how to use it safely, and a simple plan to build upper-body and core strength at home or on the road.
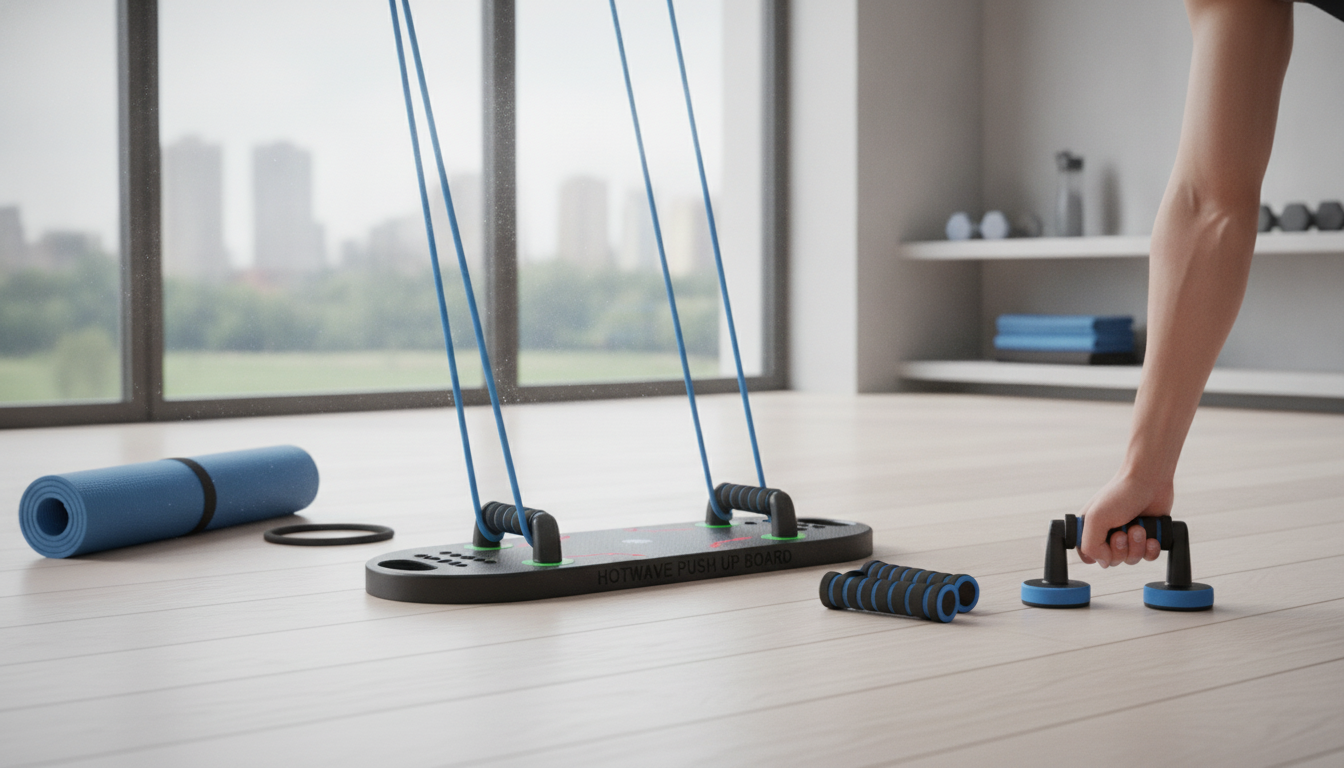
What a 20-in-1 push-up board system includes
- Color-coded slot layout that guides hand positions to emphasize different upper-body muscle groups.
- Detachable push-up handles that typically reduce wrist extension compared with palms-on-floor push-ups.
- Resistance bands and anchor points for adding pulling and pressing variations beyond push-ups.
- Foldable, portable format designed for quick setup, easy storage, and travel-friendly packing.
How it trains the upper body and core
Push-ups are simple, but small changes matter. Moving the hands and adjusting elbow path can shift emphasis between chest, shoulders, and triceps. A board with fixed slots helps make those changes repeatable—useful for tracking progress and keeping form consistent across sets.
- More targeted push-up variations: Wider or differently angled positions can emphasize chest, while narrower positions typically involve more triceps.
- Better body-line practice: A stable base helps maintain a consistent range of motion and encourages solid core bracing.
- Progressive overload options: When bodyweight push-ups stop feeling challenging, bands can increase tension so strength keeps moving forward.
- Better balance for shoulder health: Band rows and face pulls help offset lots of pressing volume, supporting healthier shoulders long-term.
For evidence-based progression, guidance from the ACSM progression models for resistance training supports gradually increasing volume and intensity over time. Pair that with the weekly movement targets in the Physical Activity Guidelines for Americans to keep your routine consistent and sustainable.
Setup and form checkpoints
- Surface matters: Place the board on a flat, non-slip surface. Avoid thick carpet that can wobble under load.
- Handle security: Lock handles fully into the selected slots before each set—no half-clicks.
- Strong body line: Keep head neutral, ribs down, glutes engaged, and feet set to a stable stance.
- Controlled reps: Lower under control until the chest is near the handles; press up without shrugging the shoulders.
- Band awareness: Confirm anchor points are secure and keep bands away from the face during tension and return.
Quick-start workout plan (no guesswork)
Start with 2–3 sessions per week, leaving at least one day between sessions. Most sets should finish with 1–3 reps in reserve (you could do a few more with good form), which helps reduce irritation in wrists and shoulders while you build consistency.
Progress weekly by adding 1–2 reps per set, adding a set, slowing the tempo, or increasing band tension. To keep training balanced, pair pushing movements with band pulling movements.
3-day push + pull routine using the board and bands
| Day | Main moves | Sets × reps | Notes |
|---|---|---|---|
| Day A | Board push-ups (chest focus) + Band rows | 3 × 6–12 each | Use a controlled 2–3 second lower; stop if shoulders pinch |
| Day B | Board push-ups (triceps focus) + Band face pulls | 3 × 6–12 each | Keep elbows tucked; face pulls light and strict |
| Day C | Board push-ups (shoulder focus) + Band biceps curls | 3 × 6–12 each | Shorten range if wrists/shoulders feel strained; add tempo for difficulty |
Progressions and regressions for every level
- Easier: Incline push-ups with hands on the board placed on a stable elevated surface (only if the setup is secure).
- Easier: Reduce range of motion and build it back over time as strength and shoulder comfort improve.
- Harder: Add band resistance to push-ups or slow eccentrics (3–5 seconds down).
- Harder: Pause 1–2 seconds at the bottom while maintaining full-body tension.
- Harder: Increase total weekly volume gradually (for example, add one extra set to one movement each week).
Safety, comfort, and durability considerations
- Wrist comfort: Handles often feel better than flat hands, but keep your grip neutral and stable—avoid collapsing into the wrists.
- Shoulder comfort: Skip flared elbows; keep shoulders away from ears and maintain controlled depth.
- Band safety: Inspect bands for cracks or tears and replace worn bands to reduce snap risk.
- Floor protection: A thin exercise mat can help on delicate flooring, but stability comes first—no sliding or rocking.
- Cleaning: Wipe down handles and board after use, especially if used outdoors or shared.
Who this home gym system fits best
Product snapshot
- Portable 20-in-1 Push Up Board with Resistance Bands – Home Gym Fitness System
- Price: 44.51 USD
- Availability: In stock
If you’re setting up a dedicated corner for training, keeping floors clear can make workouts smoother—especially when bands and anchors are involved. For quick cleanup in a multi-use space, consider the 28Kpa Cordless Vacuum Cleaner, 3 Modes Handheld Stick Vacuum for Pet Hair, Carpet & Hard Floor.
FAQ
Do push-up boards actually make push-ups more effective?
Push-ups get more effective when you keep form consistent and apply progressive overload over time. A push-up board can help by standardizing hand positions, offering guided variation, and improving wrist comfort for some people, which often makes it easier to train consistently.
How often should a push-up and resistance band routine be done?
Most people do well with 2–4 sessions per week, depending on recovery and total volume. Leave at least one rest day between hard sessions and balance pushing with pulling band work to help keep shoulders feeling good.
Are resistance bands safe for beginners?
Yes, as long as you start with lighter tension, anchor securely, and control the return instead of letting the band snap back. Inspect bands for wear and stop if you feel sharp joint pain rather than normal muscle fatigue.


Leave a comment